Customizing CI/CD with Custom Pipelines
One of the core tenets of dbt is that analytic code should be version controlled. This provides a ton of benefit to your organization in terms of collaboration, code consistency, stability, and the ability to roll back to a prior version. There’s an additional benefit that is provided with your code hosting platform that is often overlooked or underutilized. Some of you may have experience using dbt Cloud’s webhook functionality to run a job when a PR is created. This is a fantastic capability, and meets most use cases for testing your code before merging to production. However, there are circumstances when an organization needs additional functionality, like running workflows on every commit (linting), or running workflows after a merge is complete. In this article, we will show you how to setup custom pipelines to lint your project and trigger a dbt Cloud job via the API.
A note on parlance in this article since each code hosting platform uses different terms for similar concepts. The terms pull request (PR) and merge request (MR) are used interchangeably to mean the process of merging one branch into another branch.
What are pipelines?
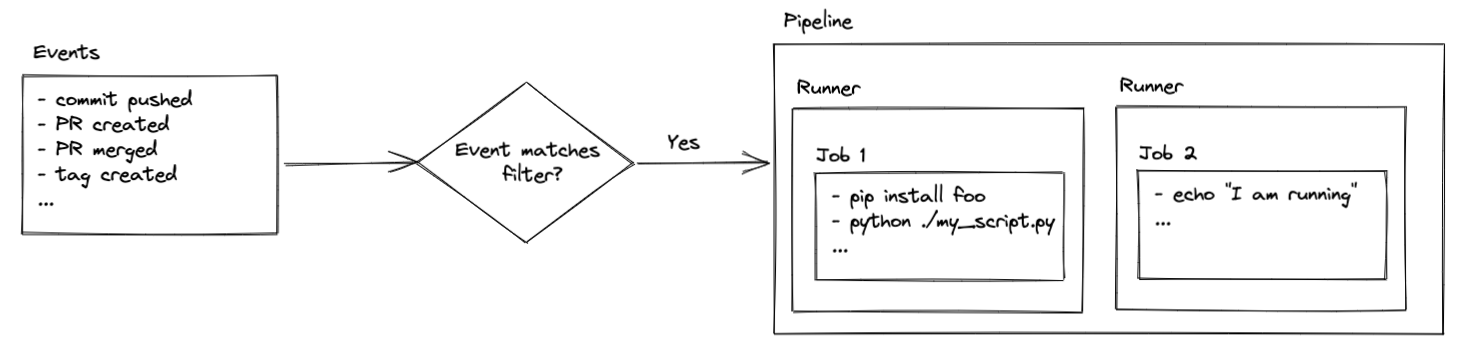
Pipelines (which are known by many names, such as workflows, actions, or build steps) are a series of pre-defined jobs that are triggered by specific events in your repository (PR created, commit pushed, branch merged, etc). Those jobs can do pretty much anything your heart desires assuming you have the proper security access and coding chops.
Jobs are executed on runners, which are virtual servers. The runners come pre-configured with Ubuntu Linux, macOS, or Windows. That means the commands you execute are determined by the operating system of your runner. You’ll see how this comes into play later in the setup, but for now just remember that your code is executed on virtual servers that are, typically, hosted by the code hosting platform.
Please note, runners hosted by your code hosting platform provide a certain amount of free time. After that, billing charges may apply depending on how your account is setup. You also have the ability to host your own runners. That is beyond the scope of this article, but checkout the links below for more information if you’re interested in setting that up:
- Repo-hosted runner billing information:
- Self-hosted runner information:
Additionally, if you’re using the free tier of GitLab you can still follow this guide, but it may ask you to provide a credit card to verify your account. You’ll see something like this the first time you try to run a pipeline:

How to setup pipelines
This guide provides details for multiple code hosting platforms. Where steps are unique, they are presented without a selection option. If code is specific to a platform (i.e. GitHub, GitLab, Bitbucket) you will see a selection option for each.
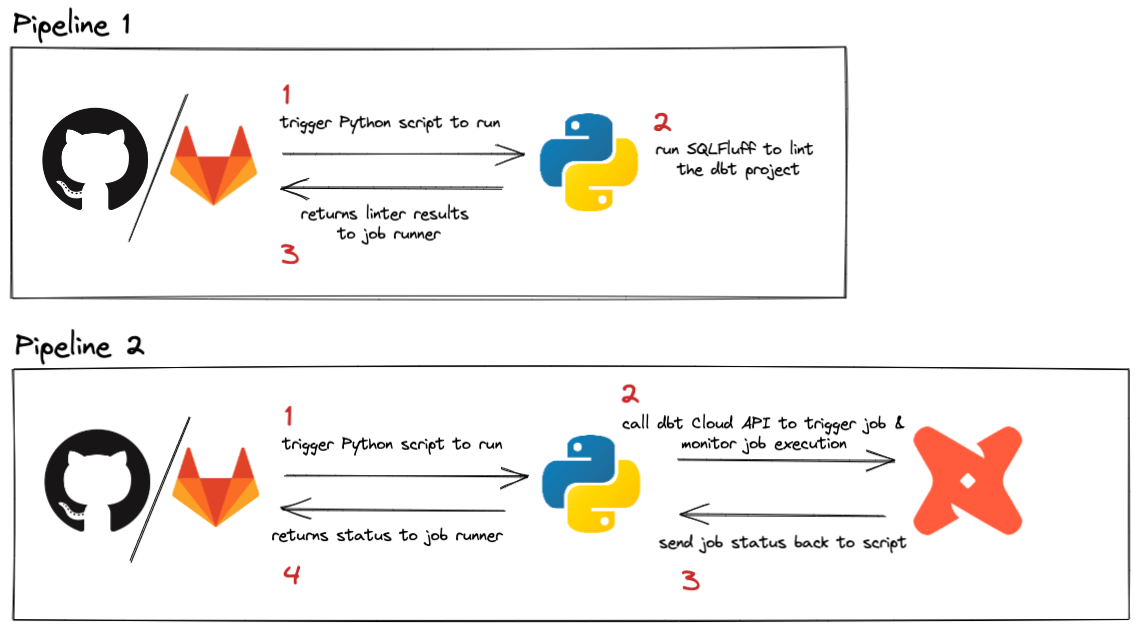
Pipelines can be triggered by various events. The dbt Cloud webhook process already triggers a run if you want to run your jobs on a merge request, so this guide focuses on running pipelines for every push and when PRs are merged. Since pushes happen frequently in a project, we’ll keep this job super simple and fast by linting with SQLFluff. The pipeline that runs on merge requests will run less frequently, and can be used to call the dbt Cloud API to trigger a specific job. This can be helpful if you have specific requirements that need to happen when code is updated in production, like running a --full-refresh on all impacted incremental models.
Here’s a quick look at what this pipeline will accomplish: